DIGscreen
Protocol for Genomic Library Screening
1. PCR DIG Labeling
The DIG Nonradioactive System from Roche is the basis for our screening protocol. It is a sensitive method for nucleic acid labeling and detection. The labeled probe can be used to detect target nucleic acid (RNA or DNA) on a membrane (Southern, Northern, or dot blot).
This is the standard method, for alternative labeling method, please see #2.
(For reagent and more details, please refer to the kit protocol.)
For each experimental or control sample, add the following components to a sterile microcentrifuge tube. Place the tube on ice during pipetting.
Steps:
1) Thaw the reagents and store on ice;
Briefly vortex and centrifuge all reagents before setting up the reactions.
2) Prepare a 10X concentration solution (1-10ul) of the forward and reverse PCR primer
3) For each 50ul reaction, add the components in the order listed below to a sterile reaction tube on ice
| Reagent | Volume Required for DIG-labeled experimental probe | Volumne Required for Unlabeled control probe | Volume Required for DIG labeled tPA control probe | Final concentration |
|---|---|---|---|---|
| Water PCR-grade | Add up to 50ul | Add up to 50ul | Add up to 50ul | |
|
PCR buffer w/ MgCl2 (10X) (vial3) |
5ul | 5ul | 5ul | 1X |
| PCR DIG probe synthesis Mix (vial2) | 5ul | - | 5ul |
200uM dATP,dCTP,dGTP, 130uM dTTP,70 uM DIG-dUTP |
|
dNTP stock solution (vial4) |
- | 5ul | - | 200uM each dNTP |
| Forward PCR | 5ul | 5ul | 5ul | 0.1-1uM |
| primer 10X conc. |
|
|
|
|
| Reverse PCR primer 10X | 5ul | 5ul | 0.1-1uM | |
|
Enzyme mix (vial1) |
0.75ul | 0.75ul | 0.75ul | |
| template | variable | variable | 5ul |
1-50ng genomic DNA/ 10-100pg plasmid DNA |
| Total Volume | 50ul | 50ul | 50ul |
4) Mix the reagents and centrifuge briefly to collect the sample at the bottom of the tube.
Note—Adjusting the DIG-dUTP concentration:
• The final concentration of DIG-dUTP (70uM), when using the undiluted PCR DIC probe Synthesis Mix (vial2), works well for labeling probes up to 1kb long.
• For labeling probes 1-3kb long, reduce the final concentration of DIG-dUTP to 35uM; Mix equal parts of PCR DIG probe synthesis Mix (vial 2) and dNTP stock solution (vial 4).
• For labeling short probes (<1Kb) of high GC content it might also be necessary to reduce the DIG-dUTP concentration to 35uM.
Ping’s note--
• For template, use water diluted cDNA mini prep product (25pg/ul). For above 50ml reaction, use 1 ul .
• Use (35uM DIG-dUTP) (2.5 ul of DIG probe mix (vial 2) + 2.5ul of dNTP (vial 4))
5) PCR program--
95°C 5min
95°C 30sà55°C 30s à72°C (time base on product) 10 cycles
95°C 30sà55°C 30sà72°C (time base on product) + 5s/cycle 20 cycles
72°C 5min
8°C Forever
6) For PCR product, clean up with Zymo DNA Clean. Check OD260.
7) Gel check
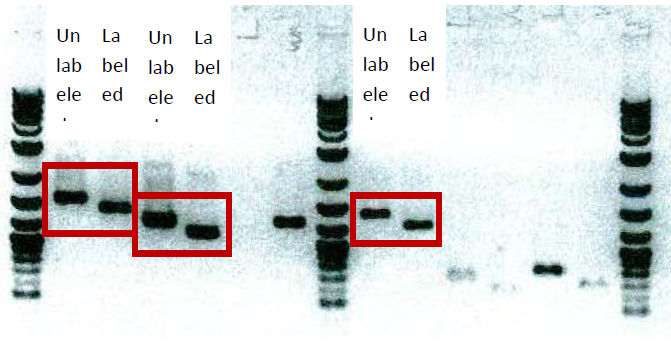
Run 2ul of labeled and unlabeled PCR onto 1% agarose gel to check the label (see picture below). If label is OK, use 40ul/20ml of labeled probe for screening.
2. DIG high prime DNA label
DNA is random primed labeled with Digoxigenin-11-dUTP using DIG-High Prime, a 5X concentrated labeling mixture of random hexamers, dNTP mix containing alkali-labile
Digoxigenin-11-dUTP, labeling grade Klenow enzyme and an optimized reaction buffer.
(For reagent and more details, please refer to DIG-High Prime DNA Labeling and Detection Starter Kit I.) *All solutions come from the Kit.
1) Add 1 μg template DNA (linear or supercoiled) and autoclaved, double distilled water to a final volume of 16 μl to a reaction vial.
2) Denature the DNA by heating in a boiling water bath for 10 min and quickly chilling in an ice/water bath.
Note: Complete denaturation is essential for efficient labeling.
3) Mix DIG-High Prime (vial 1) thoroughly and add 4ul to the denatured DNA, mix and centrifuge briefly. Incubate for 1 h or O/N at 37°C.
Note: Longer incubations (up to 20 h) will increase the yield of DIG-labeled DNA.
4) Stop the reaction by adding 2ul 0.2 M EDTA (pH 8.0) and/or by heating to 65° C for 10 min.
Note: The lengths of the DIG labeled fragments obtained with DIG-High Prime range from 200 bp to 1000 bp or larger, depending on the lengths of the original template.
3. Determination of labeling efficiency-Dilution and dot blot
Determination of the yield of DIG-labeled DNA is most important for optimal and reproducible hybridization results. Too high of a probe concentration in the hybridization mix causes background, while too low of a concentration leads to weak signals.
(For reagent and more details, please refer to DIG-High Prime DNA Labeling and Detection Starter Kit I.) *All solutions come from the Kit.
1) Apply a 1μl spot of tubes 2-9 from your labeled probes and the labeled control to the nylon membrane.
2) Fix the nucleic acid to the membrane by cross linking with UV-light or baking for 30 min at 120°C.
3) Transfer the membrane into a plastic container with 20 ml Maleic acid buffer. Incubate under shaking for 2 min at 15-25°C.
4) Incubate for 30 min in 10 ml Blocking solution.
5) Incubate for 30 min in 10 ml Antibody solution.
6) Wash with 10 ml Washing buffer, 2 × 15 min.
7) Equilibrate 2-5 min in 10 ml Detection buffer.
8) Place membrane with DNA side facing up on a development folder (or hybridization bag) and apply 0.1 ml CSPD ready-to-use (i.e. 4 drops from the dropper bottle 5) to the membrane.
Immediately cover the membrane with the second sheet of the folder to spread the substrate evenly and without air bubbles over the membrane. Incubate for 5 min at 15-25°C.
9) Squeeze out excess liquid and seal the edges of the development folder. Note:
Drying of the membrane during exposure will result in dark background.
10) Expose to an appropriate imager for 5-20 min or to X-ray film for 15-25 min at 1525°C.
Note: Luminescence continues for at least 48 hours. The signal increases in the first few hours after initiation of the detection reaction until it will reach a plateau where signal intensity remains almost constant during the next 24 – 48 hours. Multiple exposures can be taken to achieve the desired signal strength.
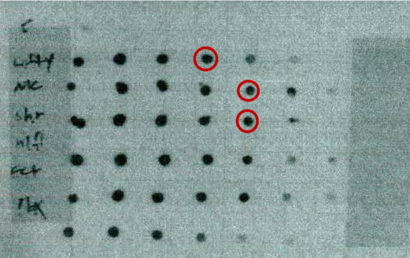
Compare the intensity of the spots out of your labeling reaction to the control and calculate the amount of DIG-labeled DNA. If the 0.1 pg dilution spots of your probe and of the control are visible, then the labeled probe has reached the expected labeling efficiency. '
4. Screen library
(For reagent and more details, please refer to DIG-High Prime DNA Labeling and Detection Starter Kit I.) *All solutions come from the Kit.
1) Stripping filters
(Important Tip: Membranes should never be allowed to dry before stripping. Once dried, the membrane cannot be stripped and reprobed.)
Stripping DIG-labeled DNA Probe after Chemiluminescent Detection
• Rinse membrane thoroughly with double distilled water for 1 min
• Wash membrane twice at 37°C in Stripping Buffer (0.2 M NaOH containing 0.1% SDS) for 15 min each.
• Rinse membrane with 2X SSC for 5 min
2) Prehybridization in 40ml DIG Easy Hyb at 48°C for 1 hour
3) Denature the probe--all probes mixed in 350ul 10uM Tris and denatured under 95°C for 5min, then chill quickly on ice bath
4) Hybridization solution-- Immediately add the denatured probe to a tube containing the appropriate amount of prewarmed DIG Easy Hyb (3.5 ml per 100 cm2) and
mix by inversion (avoid foaming) to form the hybridization solution
5) Pour off the prehybridization buffer. Immediately add hybridization solution containing DIG-labeled probe and hybridization at 48°C for 6-16 hours
6) Wash with low Stringency Buffer (1L 2X SSC containing 0.1% SDS) at room temperature for 15min twice
7) Preheat high Stringency Buffer (1L 0.5X SSC containing 0.1% SDS) into 65°C
8) Wash with preheated high Stringency Buffer (1L 0.5X SSC containing 0.1% SDS) at 65°C for 15min twice
5. Immunological Detection
(Please refer to protocol of DIG-High Prime DNA Labeling and Detection Starter Kit I.) *All solutions come from the Kit.
9) After hybridization and stringency washes, rinse membrane for 2 min in Washing buffer.
10) Incubate in 250 ml 1XBlocking solution for 1 hour under room temperature
11) Prepare Antibody solution: Spin AP antibody at 10rpm for 5min and then add AP antibody into 100ml 1Xblocking buffer into 1:10000.
12) Incubate in 100ml Antibody solution for 1 hour 13) Wash in 500ml Washing buffer (2X SSC)15min twice 14) Equilibrate 5 min in 20ml Detection buffer.
15) Incubate membrane in 10 ml freshly prepared color substrate solution in a appropriate container in the dark for 5 min. Do not shake during color development.
16) Expose 30min & develop film.
6. Check the correct probe for the positive clone
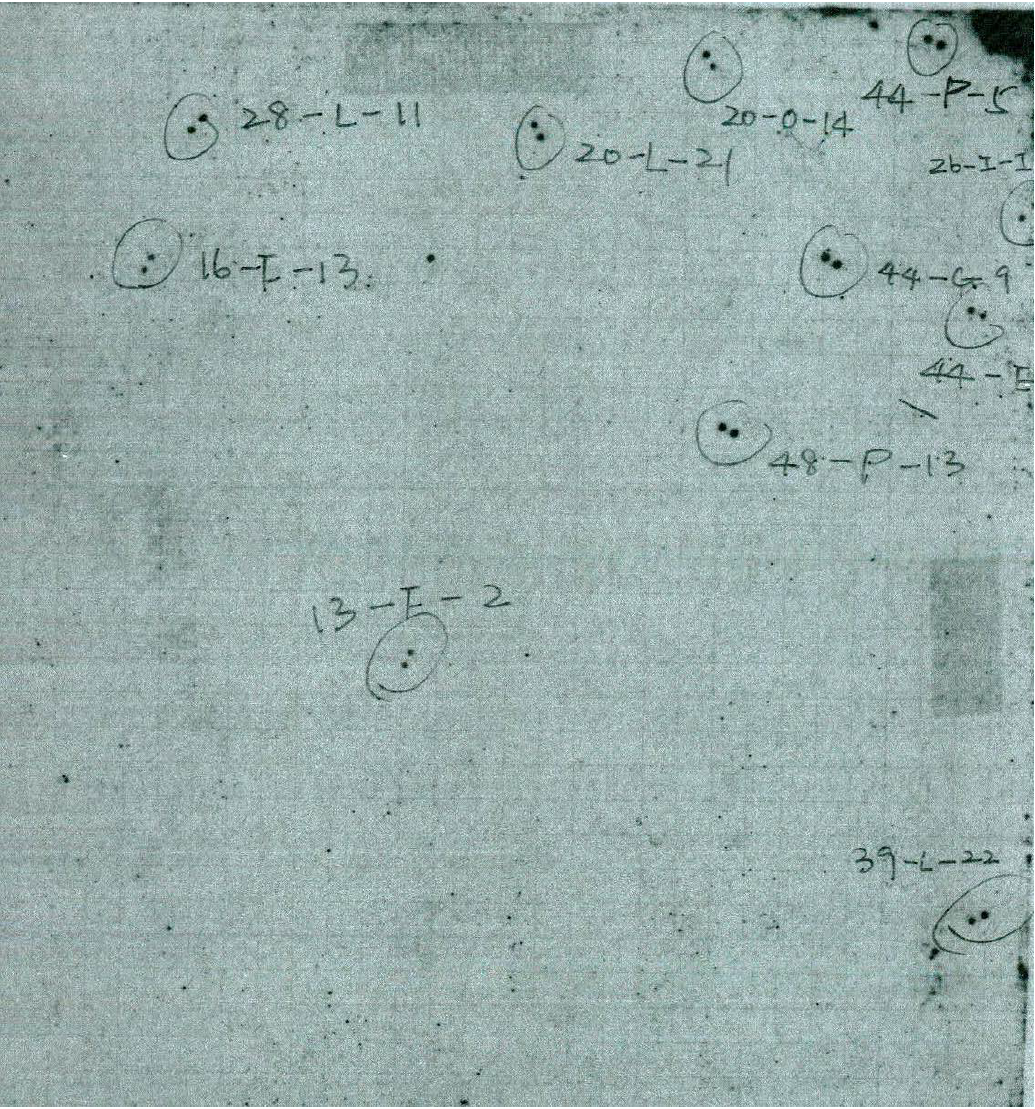
1) Pick up all positive clones and mini prep.
2) Put positive clones DNA to make dots in small filter
Redo the hybrization (steps 4(2) until the end) with individual probes to tell which probe this clone is responding to.


